

Does your team actually have a process for managing absences in Jira — or just a habit?
Many mid-size companies handle employee absences the same way they always have: a message in a chat channel, an email to a manager, maybe a calendar entry if someone remembers. It works until it doesn’t — until a critical sprint collapses because two senior developers are on holiday at the same time, or a leave request slips through without approval because no one owned the process.
Jira can do more here than most teams realise. By combining Jira’s native workflow and automation tools — including Assets for employee data and a Rovo agent for out-of-office messaging — with a dedicated app like User Absence Planner, you can build a structured, repeatable process for absence submission, approval, and team availability tracking, without adding another tool to your stack. This use case walks through how to do exactly that.
The problem: absence planning as an afterthought
When absence management lives outside Jira, it creates a split between where work is planned and where people availability is tracked. Managers end up making sprint commitments or project plans based on an inaccurate picture of who is actually available.
Last-minute absences are disruptive not because they are unexpected — holidays are rarely a surprise — but because they were never surfaced at the right time or to the right people. For Jira admins and team managers in mid-size organisations, the challenge is building a process that is formal enough to be reliable, but not so bureaucratic that people stop using it.
The solution: a four-step absence management process in Jira
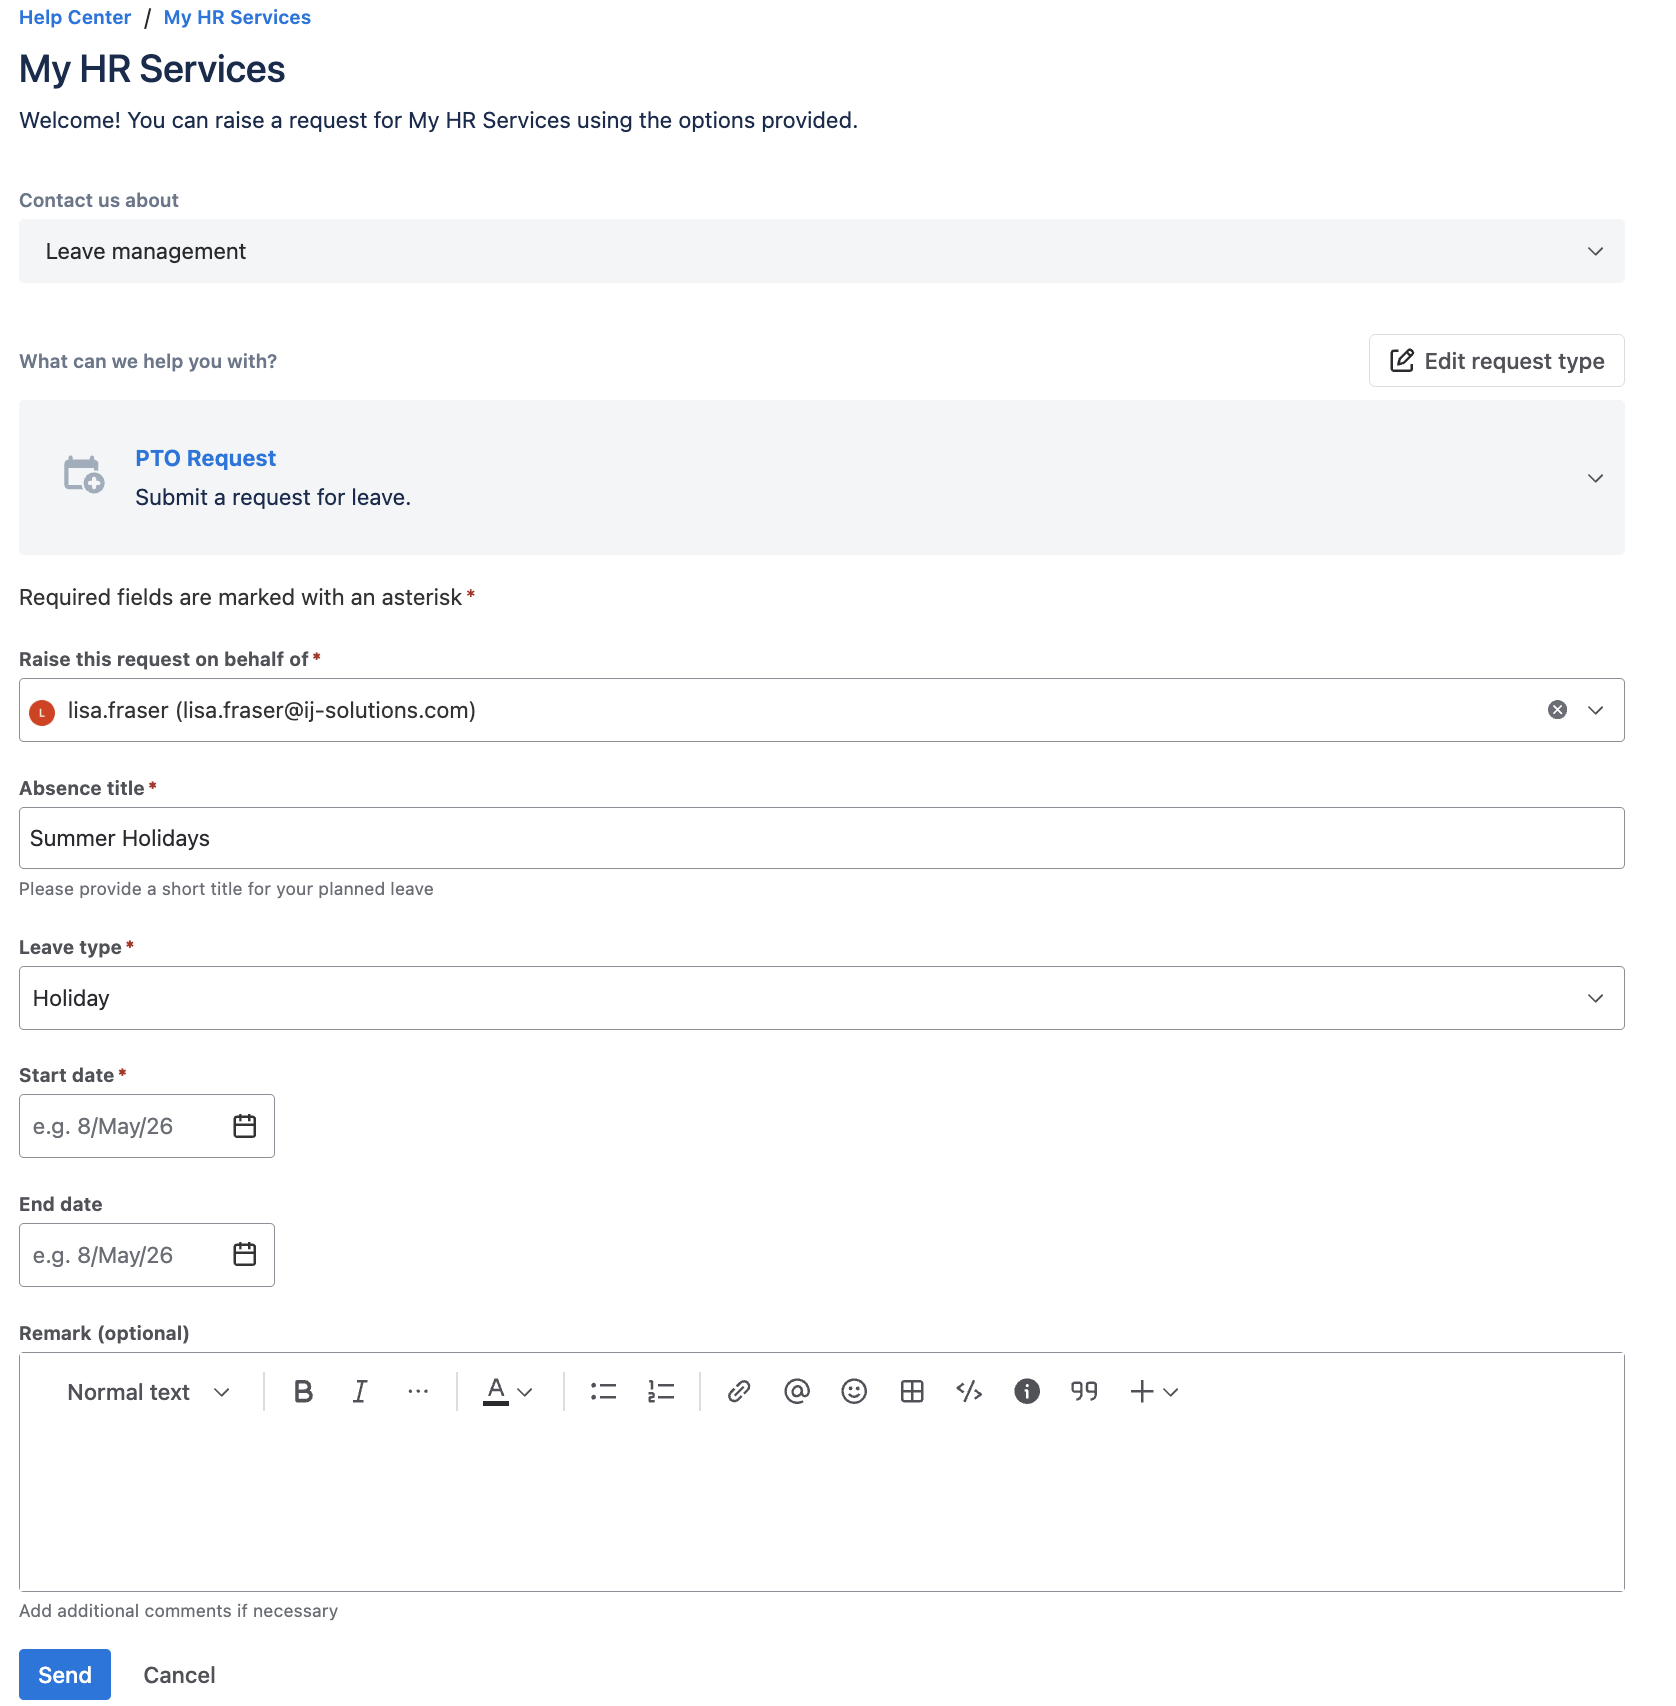
1. Give employees a structured way to submit absence requests
The first step is replacing informal requests with a consistent submission method. Create a dedicated Jira issue type — for example, ‘Absence Request’ — within a project set up specifically for HR or team operations.
Define the fields that matter: absence type (holiday, sick leave, personal day), start date, end date, and covering team member if applicable. This gives every request a visible, trackable record in Jira from the moment it is submitted, rather than buried in someone’s inbox.
2. Use Assets and Jira Automation to route requests to the right approver
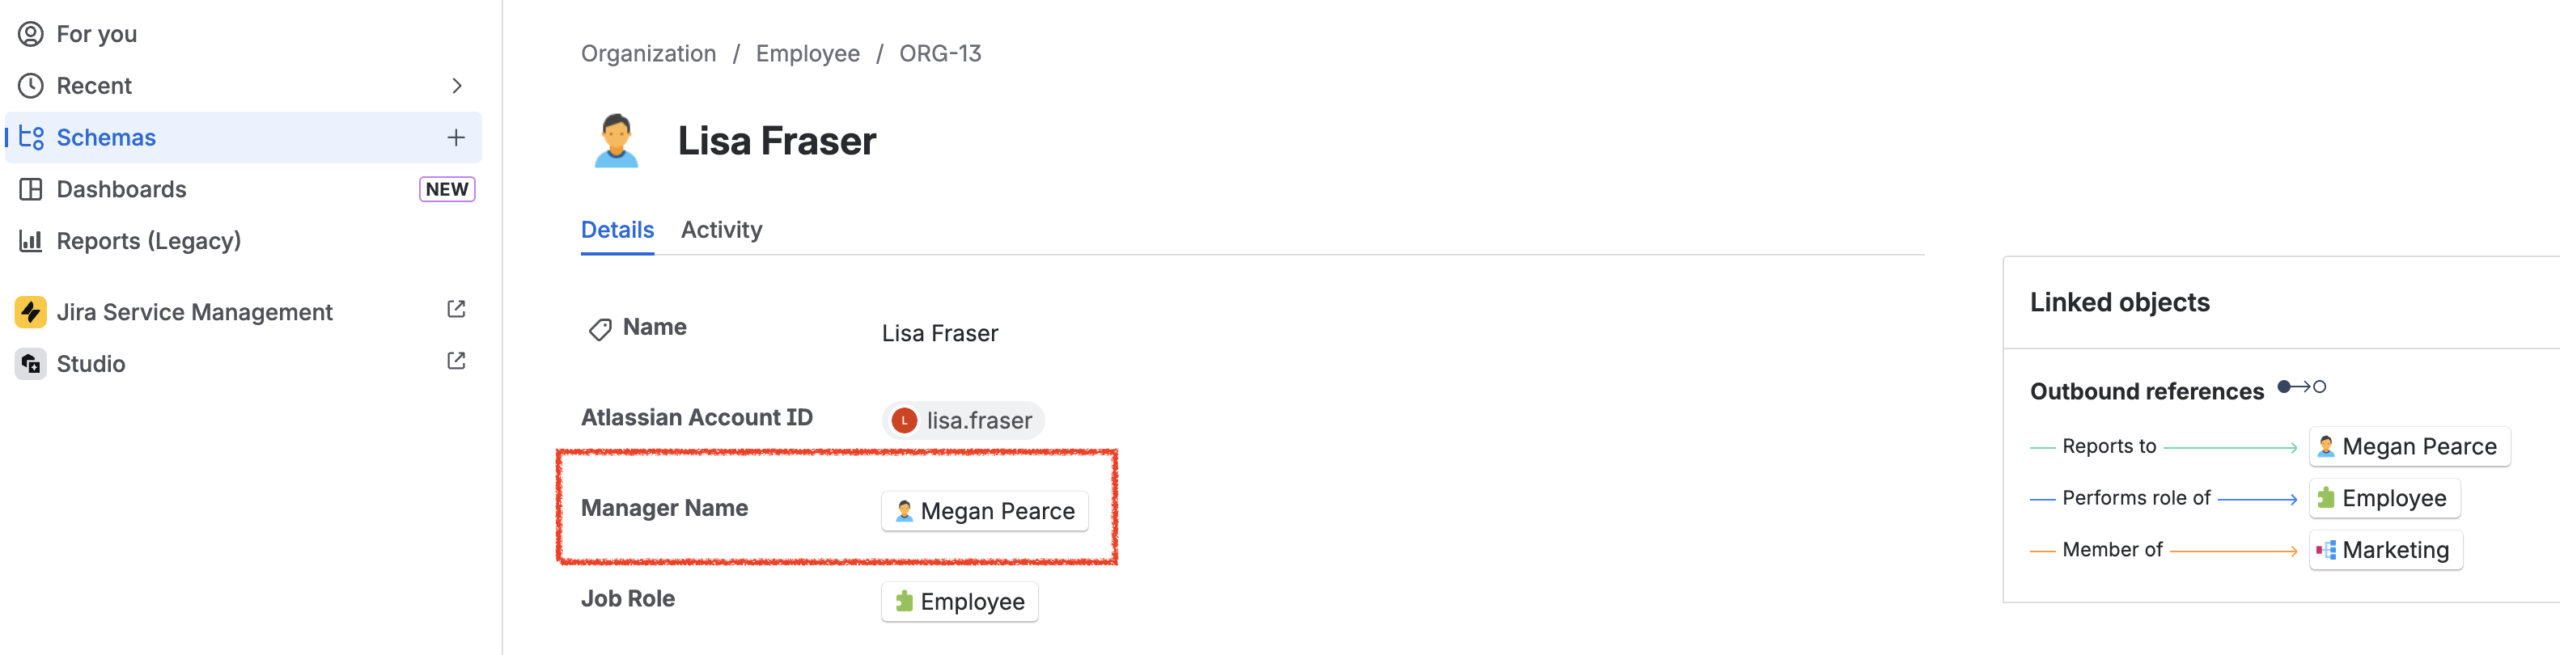
Once a request exists as a Jira issue, Jira Automation can immediately enrich it with context from your Assets data. When the issue is created, an automation rule looks up the requesting employee in Assets and populates key fields on the issue: their manager (who will handle approval), their department, and their role.
This lookup step matters because it removes a common failure point — requests sitting unactioned because no one knew who should approve them. By pulling the manager directly from Assets, the workflow routes the request automatically without relying on the employee to know or enter that information themselves.
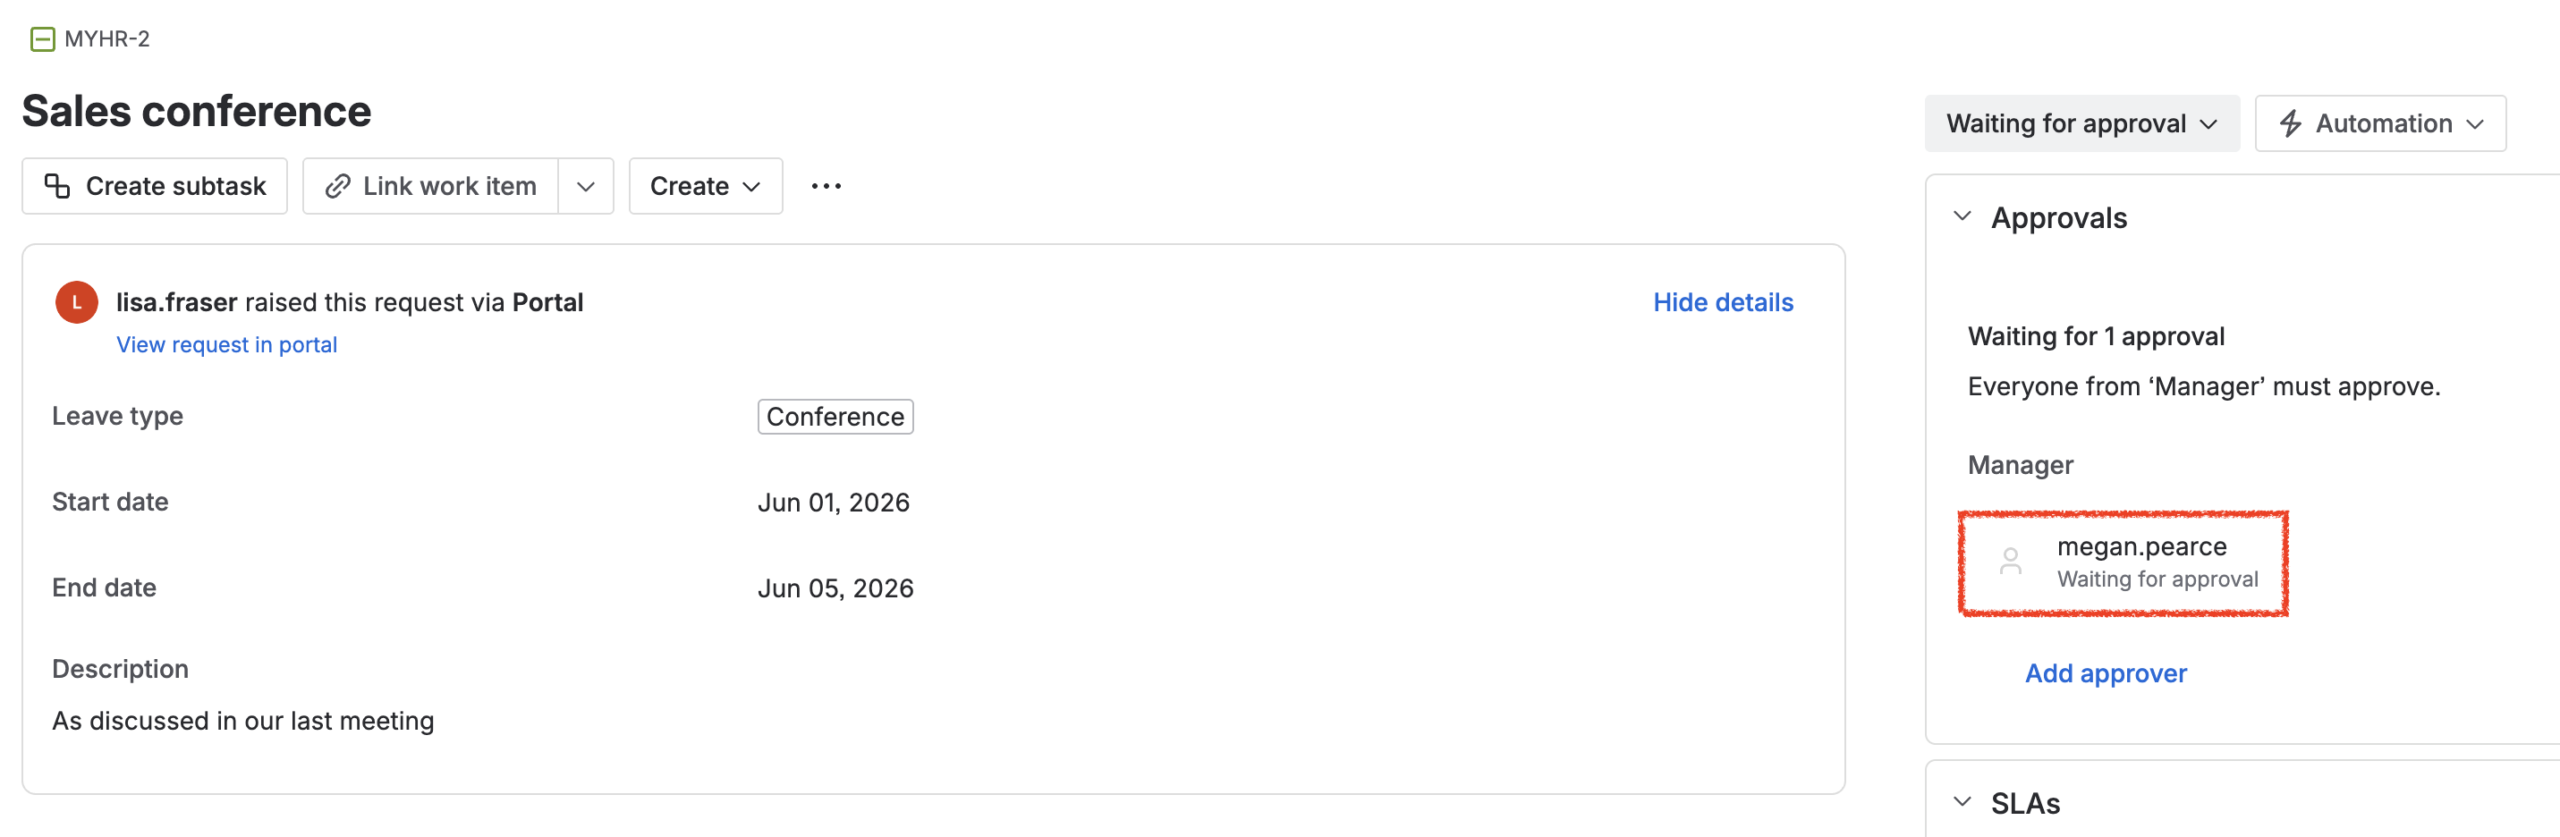
With the issue enriched, you can route it through a proper approval workflow. Configure workflow statuses such as ‘Submitted’, ‘Waiting for Approval’, ‘Approved’, and ‘Declined’. Assign transition permissions so that only the assigned manager or HR leads can move a request to ‘Approved’ or ‘Declined’.
Layer additional Jira Automation rules on top to keep the process moving:
Notify the relevant manager via comment or email when a new absence request is assigned to them
Alert the requester automatically when their request status changes
Flag conflicts by triggering a notification if another team member’s approved absence overlaps with the requested dates
Escalate stalled requests by sending a reminder if a request has sat in ‘Under Review’ for more than a set number of days
3. Use a Rovo agent to generate the out-of-office message
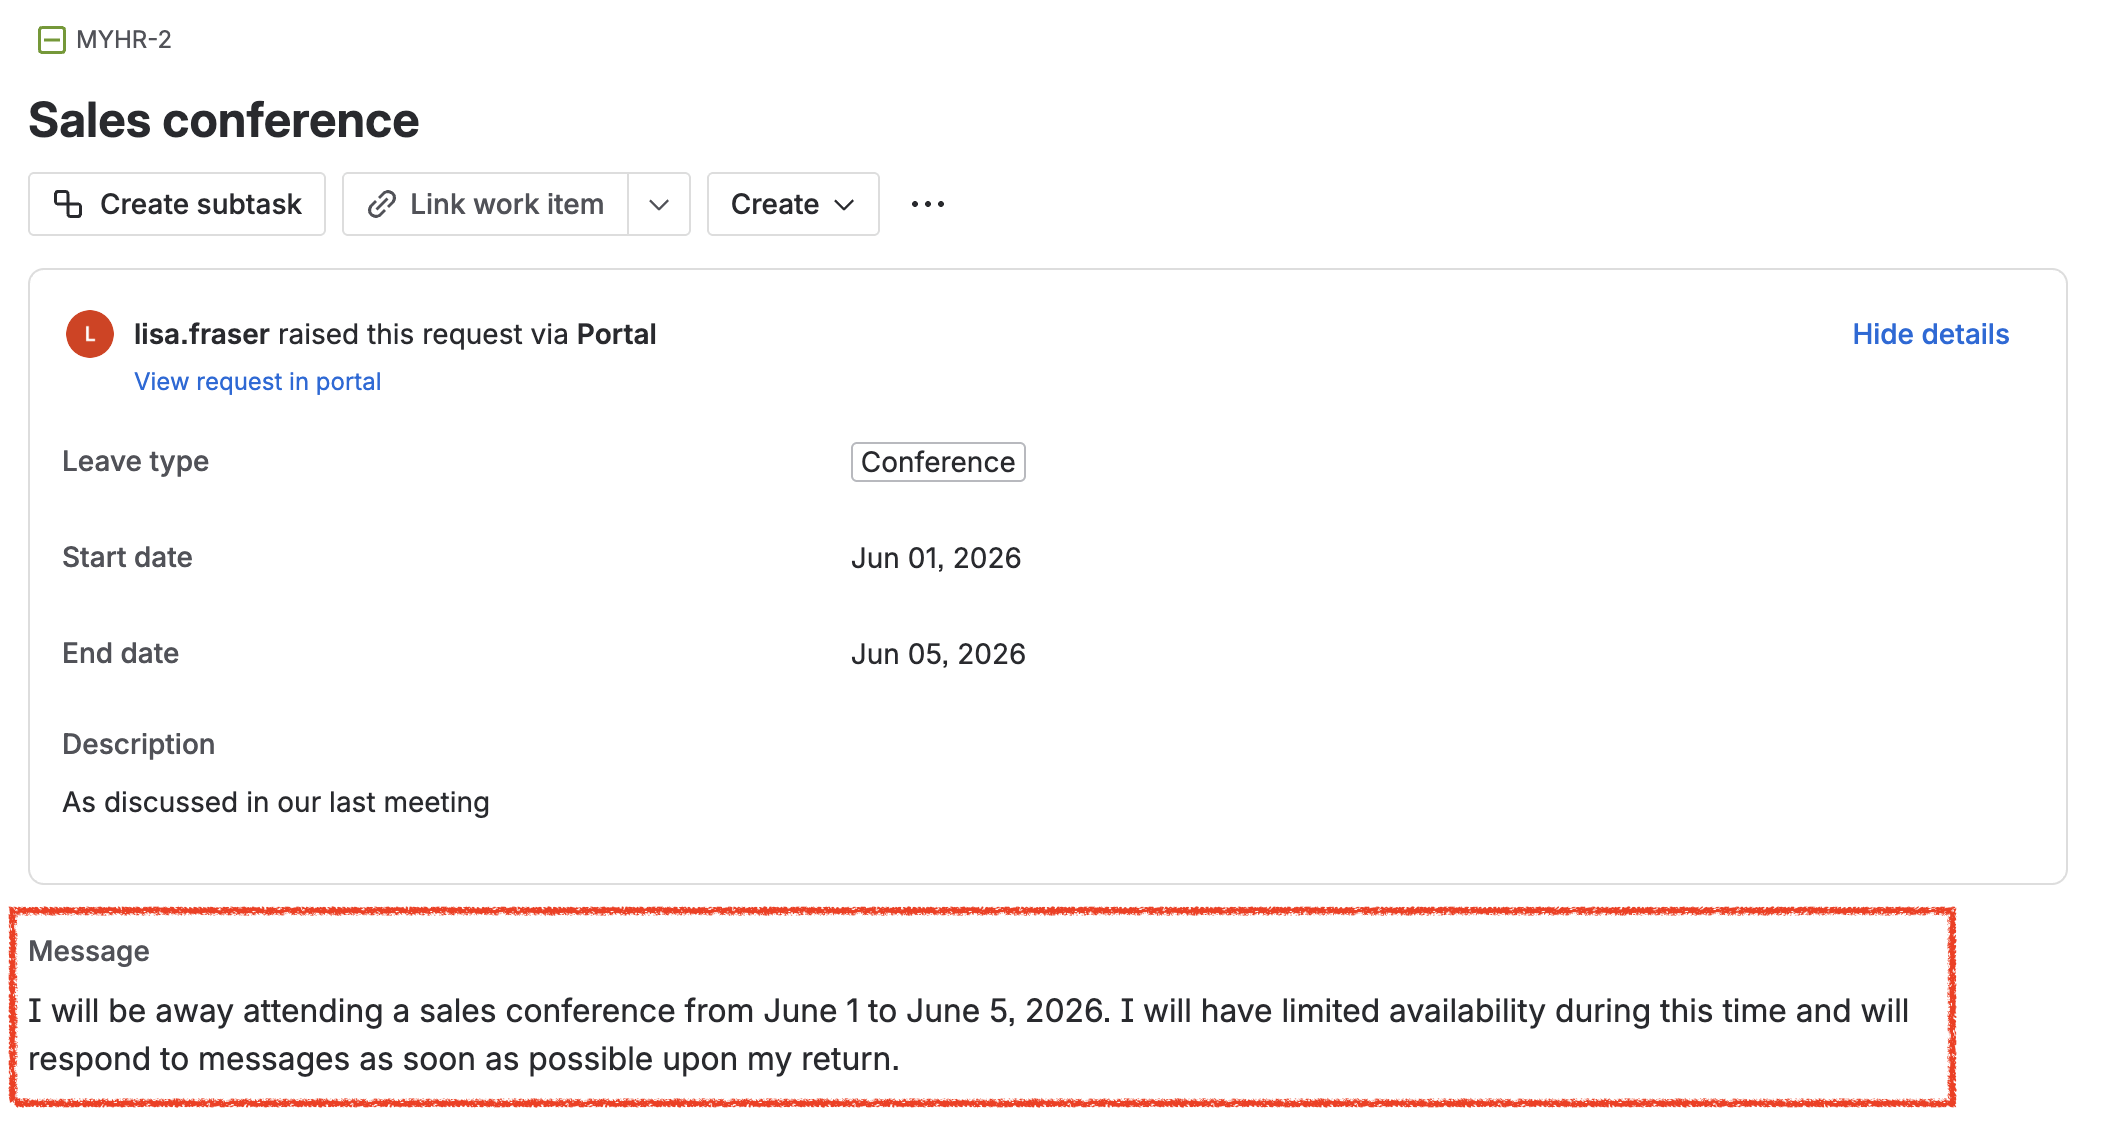
Before the absence is created, a dedicated Rovo agent handles one step that would otherwise require manual input: writing the out-of-office message. The agent receives the request details — employee name, absence type, dates, department, and covering colleague — and generates an appropriate absence message, which is written back to a dedicated field on the Jira issue.
Using a Rovo agent here keeps the message consistent and professional without requiring the employee or manager to write anything from scratch. The content is generated based on the actual request data, so it is always accurate and contextually appropriate.
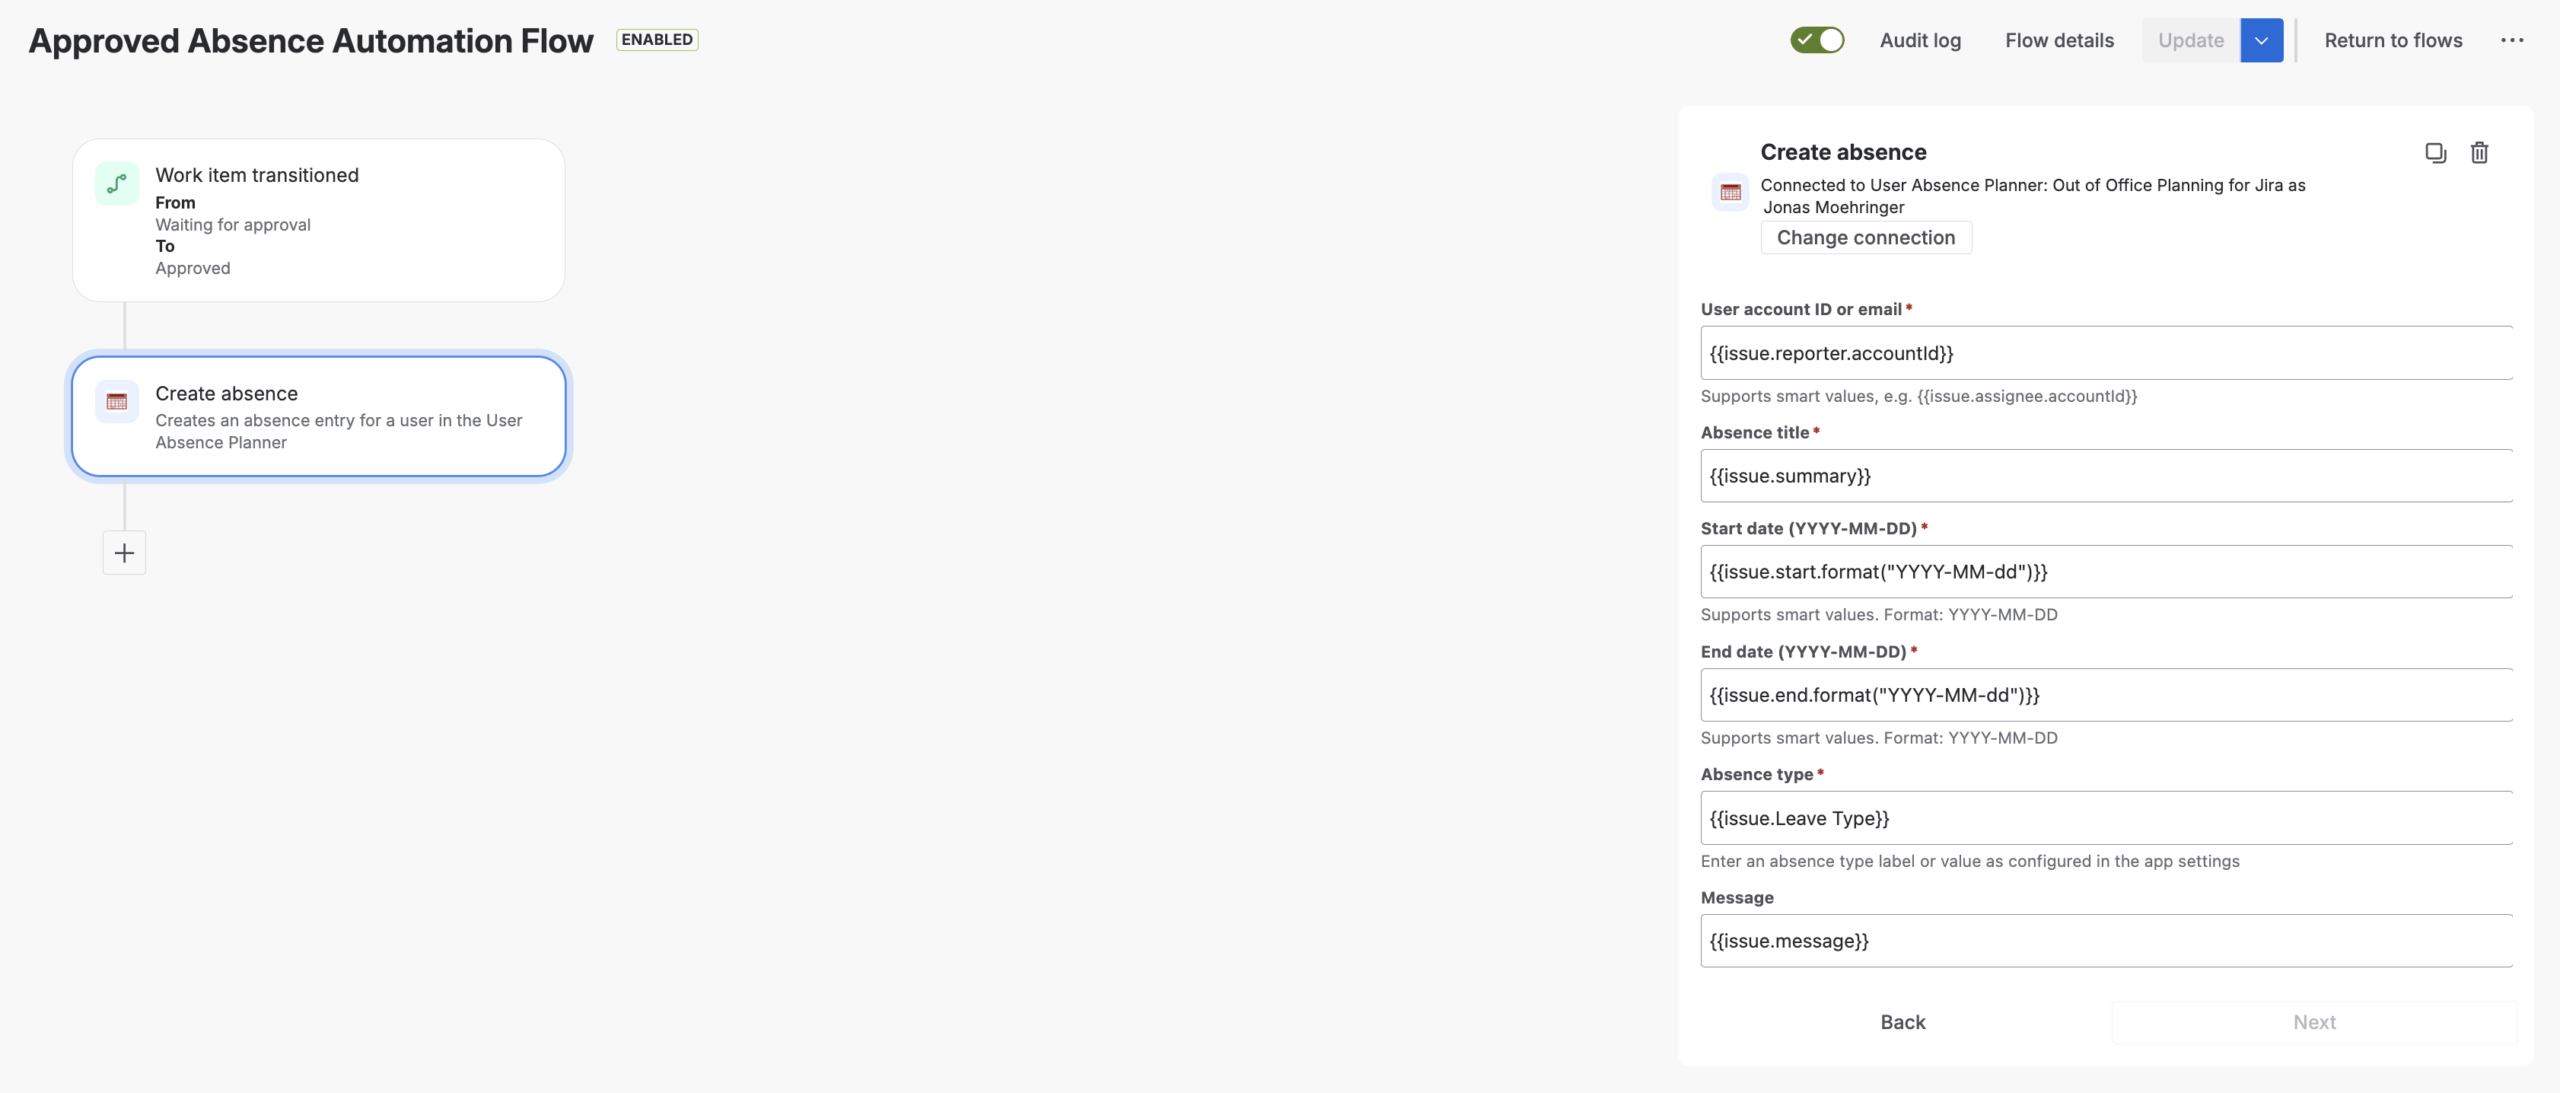
Create the absence automatically on approval with User Absence Planner
When the request is approved — that is, when the issue transitions to ‘Approved’ status — a User Absence Planner automation action fires automatically. It reads the approved dates, absence type, employee details, and the out-of-office message generated in the previous step, then creates the absence record directly in User Absence Planner without any manual data entry.
This step closes the gap that often exists in manual processes: the approval happens, but the system never gets updated. Here, the two are connected. The moment a manager approves a request, the absence is registered and active — complete with the correct out-of-office message.
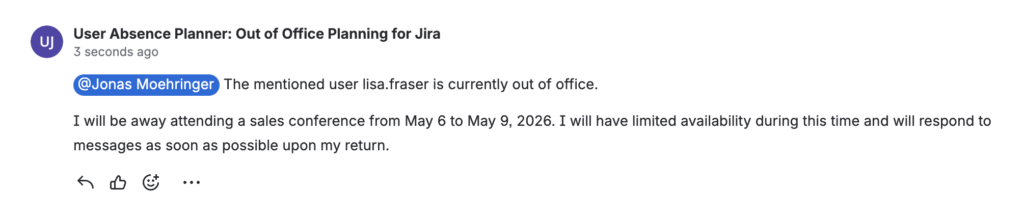
The out-of-office message is not just a description for internal reference. It is the official text that User Absence Planner displays in the issue view while the user is away. It is also used by the app when it automatically comments on issues during the out-of-office period — for example, to notify reporters or assignees that the person they are waiting on is currently absent.
What does absence visibility look like in practice?
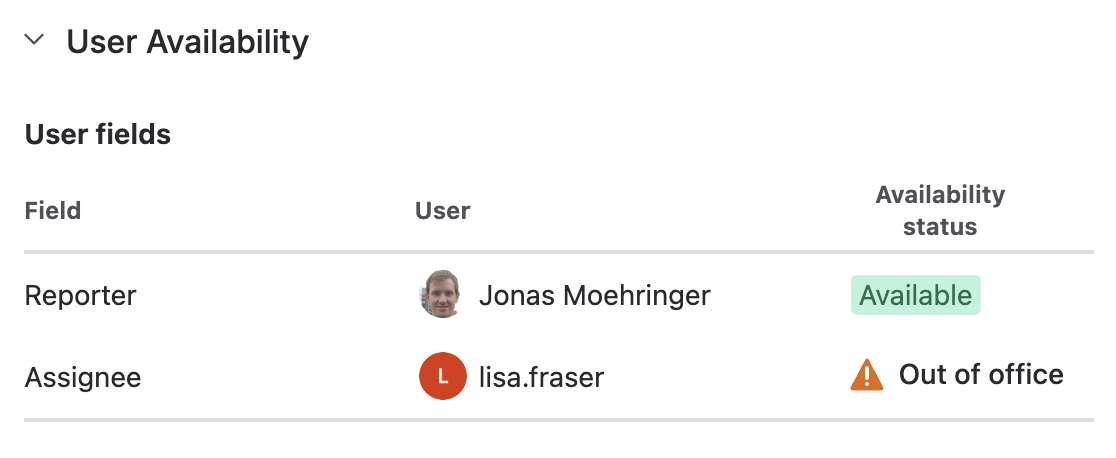
Once absences are created in User Absence Planner, they are available across Jira in several practical ways. The app checks user fields in issues against the list of absent users and can automatically reassign issues to a covering team member when the assignee is away. It also handles out-of-office comments on issues during the absence period, so colleagues are informed without any manual intervention. Users with the appropriate permissions can additionally view absences for other users or groups directly within the app.
This means absence information is not siloed in a separate system — it is active and actionable inside the same Jira environment where work is being managed.
The outcome: fewer surprises, better planning
Teams that consolidate absence management inside Jira with this approach typically see a few concrete improvements:
Requests no longer go missing. Every submission has a visible status and an owner.
Approval routing is automatic. Assets ensures the right manager is assigned without the employee needing to know the reporting hierarchy.
Out-of-office messages are generated consistently. The Rovo agent produces accurate, professional messages based on actual request data — no manual drafting required.
Absence records are always up to date. Approval and absence creation happen in a single step, not two separate manual actions.
Work keeps moving during absences. User Absence Planner detects absent assignees, reassigns issues automatically, and comments on affected issues so nothing falls through the cracks.
Audit trails exist. The full record — including the Assets lookup, the generated message, the approval, and the absence creation — is in Jira.
The process scales without additional overhead. As teams grow, the same workflow handles ten absence requests or a hundred.
In a nutshell
Absence management in Jira becomes reliable when it is treated as a workflow, not an informal habit. A dedicated Jira issue type captures each request; Jira Automation fetches the employee’s manager, department, and role from Assets to route it correctly; a Rovo agent generates the out-of-office message based on the request details; and when the manager approves, User Absence Planner creates the absence record automatically — including the out-of-office message used in issue views and automated comments. From that point, User Absence Planner handles absence visibility directly: checking for absent assignees, triggering issue reassignments, and notifying colleagues through automated comments. The result is a process with no manual handoffs, consistent messaging, and absence information that is always current where work is happening.
Interested in setting this up for your team? User Absence Planner is available on the Atlassian Marketplace. The ij-solutions consulting team can also help you design and configure absence management workflows tailored to your organisation’s approval structure. Reach out at any time via our support portal or book a demo now!